
If you’re looking to adjust color in your photos, mainly the hue, saturation, and/or luminance, the HSL panel in Lightroom will be your go-to. The HSL Panel in Lightroom allows you to adjust the hue, saturation, and luminance of eight specific colors individually. As seen in the photos below, the HSL and Color panels are located just below the Tone Curve panel, which was discussed in the last Workflow Friday blog post.
HSL Panel: An Overview
Since the HSL panel is pretty self-explanatory, I will show a few examples that will give you an intuitive feel for the effects this panel can have on your image. One thing that I will mention though, these are universal adjustments affecting the entire image. If you need to adjust an image locally that will have to be done with the Local Adjustment tools (located at the top of the right hand panel in the Develop module) or in Photoshop.
 HSL Panel - Lightroom Tips by Michael Clark
Here is a screenshot of the HSL panel. Note that the HSL panel, and the color panel shown in the second photo, have the same sliders, but are organized a little differently.
 Color Panel - Lightroom Tips by Michael Clark
Here is a screenshot of the Color panel. Note that the Color panel, and the HSL panel shown in the first photo, have the same sliders, but are organized a little differently.
As a side note, there are two versions of the HSL panel as shown in the two photos above. This alternate version of the HSL panel shows all three sliders for each color and the color is chosen by clicking on the color icons at the top of the panel. This is technically the "color" option in the "HSL / Color / B&W" panel, but it has the same controls as the HSL section. I prefer to see all of the sliders laid out (see first photo), so I can see what adjustments I have made to each slider all at once.
HSL Panel: Saturation & Luminance Example
The ability to adjust the saturation for a specific color is fantastic. There are many images where I have created a warm/cool effect using strobes and gels against a deep blue sky, and I am able to exaggerate that warm/cool effect in the raw processing using the HSL panel. Yet, another useful trick using the HSL panel is the ability to use the Luminance sliders to darken blue skies. By pulling the Blue Luminance slider to a negative position, you can darken blue skies. Though, be aware that if there is blue elsewhere in the image, you will also darken all of the blues in the image, which may or may not be what you want.
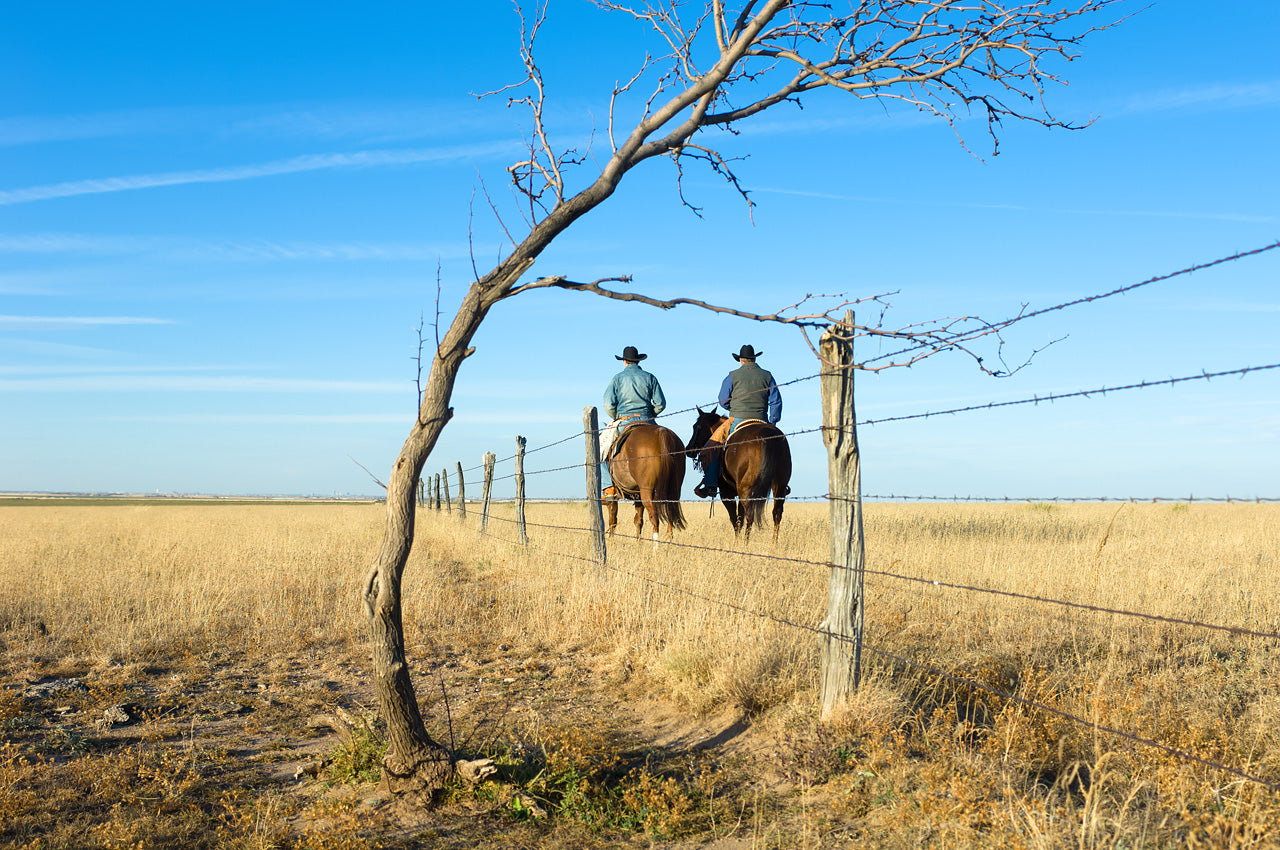
 Blue Luminance slider in the HSL Panel - Lightroom Tips by Michael Clark
 Blue Luminance slider in the HSL Panel - Lightroom Tips by Michael Clark
In the two images above, I show the effect of pulling the Blue Luminance slider in the HSL panel to the left. In the top screenshot, the HSL sliders are at their defaults. In the bottom screenshot, I have pulled the Blue Luminance slider to the left (-23). Notice how the blue sky, and to some degree the blue jackets the cowboys are wearing, have become darker and slightly more saturated.
HSL Panel: Desaturating Skin Tones
Another color effect I can create using the HSL panel is to desaturate skin tones, such as removing some of the redness that seems to pop up in Caucasian skin tones. This is a very subtle adjustment, but it can make skin tones a bit more believable. To accomplish this effect, I desaturate the red, orange, and yellow colors in the image by pulling the Red, Orange, and Yellow Saturation sliders out to -7, -5 and -2 respectively. At the same time, I will also move the Red, Orange, and Yellow Luminance sliders to +6, +4 and +3 respectively to lighten those colors. The numbers I am quoting here are approximate and may vary depending on your image. You can see the result of this adjustment in the photos below. Please note that this is a very subtle effect and to really dial in the skin tones you will need to have a calibrated and profiled monitor. To get more in depth with this, visit my color management blog post for more information on this important topic.
 Desaturating Skin Tones in the HSL Panel - Lightroom Tips by Michael Clark
 Desaturating Skin Tones in the HSL Panel - Lightroom Tips by Michael Clark
In the before (top) and after (bottom) images above, I am showing how this desaturated HSL skin tone adjustment looks on an image. To create this lightening and desaturation of the skin tones I pulled the Red, Orange, and Yellow Saturation sliders out to -7, -5 and -2 respectively. At the same time I will also move the Red, Orange, and Yellow Luminance sliders to +6, +4, and +3 respectively.
HSL Panel: Things to Know
These are just a few examples of how you can use the HSL sliders to enhance your images. The only suggestion I would have with this panel is to go easy with the Hue sliders since they can easily introduce a colorcast to your image. I rarely ever use the Hue sliders, and the only times I can remember using them was to alter the hue of a blue sky. Often, if there are hue issues in the image, or if there is a colorcast in the image, then those would be more easily corrected with the white balance slider than with the Hue sliders in the HSL panel.
 Cam Foreman and his son, Hayden Forman, riding horses on their ranch near Canyon, Texas.
Here is the final image of the Cowboys after it was fully worked up in Lightroom and Photoshop.
As you can see, there are an infinite number of effects that can be created using the HSL panel. This is yet another very simple and effective tool in the Lightroom Develop module. If you have any other ways of manipulating the color in the HSL panel, please feel free to share examples of those in the comments section of this blog post.

This blog post is a modified excerpt from my e-book, Adobe Photoshop Lightroom: A Professional Photographer’s Workflow. For more information on this e-book or to purchase the e-book please visit my website.
KEEP UP WITH MICHAEL:
Website | Blog | Workshops | Facebook | Twitter | Instagram |
Google+ | Behance