
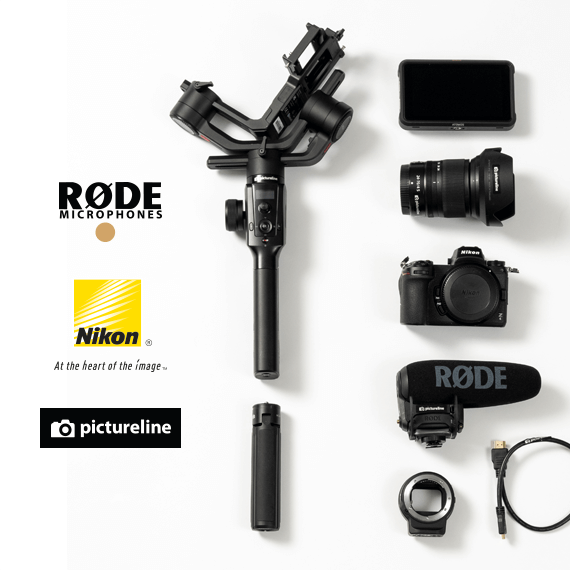
This tutorial will show you how to set up the Nikon Z6 Filmmaker's Kit so you're ready to shoot. It comes with the Moza Air 2 Gimbal, the Nikon Z6 camera, the Rode video mic pro, cables and adapters, media and the Ninja V Recorder.
First off, we are going to assemble the accessories onto the Moza Air 2 Gimbal. I'll take the Moza Gimble and I'm going to screw the arm onto the front of the gimbal until it's tight. You want this to be very firm.
Now I'm going to take the Ninja V and screw it onto the arm. While holding the Ninja V, I'm going to release the arm so that it's loose and you can place it wherever you'd like but I'm going to place it on the left side of the gimbal and then tighten the arm.
Finally, take the media and insert it into the Ninja V. Now take the camera and put the plate on the bottom. Using your fingers, tighten the screw and then use a coin or a flathead screwdriver to tighten it completely. This plate needs to be securely fastened onto the camera. Next, take the rode mic and slide it into the hot shoe on the camera, fasten it and then plug it into the side of the camera.
Balancing the Tilt Axis
There are three steps to balancing the gimbal—balancing the tilt axis, the roll axis and the pan axis. We will start with the tilt axis. Take the camera and slide it on to the quick release plate. Now, I want to adjust the camera until the cameras stay still when I let go of the tilt axis. So I'll slide it forward or back until it doesn't move. Now I lock the tilt axis lever. There is a second step to balancing the tilt axis move the camera to the other side and we're gonna balance this axis.
If I move the camera back the rode mic hits the roll motor so I need to move the camera forward in order to balance this access. We need to fix this tilt axis. Start by loosening this screw. I'm going to tilt the camera horizontally and then move this axis left or right until the camera stays still. Now tighten the screw. To make sure that you balance the tilt axis correctly, move the camera upwards 45 degrees and with the camera down 45 degrees. At both angles, the camera should stay still.
Balancing the Roll and Pan Axis
Now we're going to balance the roll access. Loosen the screw and move the axis left or right until the camera doesn't roll. Now I'll tighten the screw. Now to do the pan axis loosen the screw and I'm going to bring the camera down horizontally. Move the roll motor to its side and if you see that the roll motor moves up or down the pan axis isn't balanced so we're going to move the pan axis back and forth until that roll motor stays still. Now, I'll tighten the screw and we're ready to plug in the cables. Take the USB cable and plug the one end into the Moza right here and take the other end and plug it into the side of the camera.
Now take the HDMI cable plug, the full-sized end, into the Ninja V and take the other end and plug it into the camera. With the cables plugged in you might need to make a few adjustments to your gimble's balance. Now we're ready to turn on the gimbal. To turn on the gimbal, press and hold on the record button. The numbers on the gimble refer to the sensitivity of the axes, L refers to lock mode. All of the axes are in lock mode. If you press once on the joystick it'll change the pan mode to follow or F.
Now the gimbal will follow my pan movements while the tilt and roll are locked in LLF mode the gimbal follows my pan movements but the roll is locked and the tilt is locked If I press on the joystick twice the role mode is switched to follow and if I press on the joystick three times the tilt access is switched to follow. Now all the axes will follow my movements.
In this mode, the gimbal will follow my pan movements, my role movements and my tilt movements. You can tilt down or tilt up. I'm going to press on the joystick twice to turn the mode to FLF this is a good mode for general use. In FLF mode, the gimbal follows my pan movements, it follows my tilt movements, but the roll axis is locked. I can change the sensitivity of the axes in any mode by scrolling on the wheel.
The settings that I prefer when using this gimbal is LLF and sensitivity set to 45. There are other buttons on the wheel. If I click down on the wheel, I can change the aperture. If click left on the wheel, I change the ISO and if I click up on the wheel, I change the shutter speed. The wheel on the side of the gimbal is currently set to adjust the roll access. The trigger on the front of the gimbal allows you to manipulate the movement while in use. If you hold the trigger, it locks the movement of the axes regardless of the mode you're in. If you double tap the trigger the gimbal returns to its original position.
Configuring Video Settings for Ninja V
Next, we're going to configure our video settings to work with the Ninja V. I'm going to click on the menu button and then go to video settings. I have my current frame size and frame rate set at 4k at 24 frames per second. Next, we will need to change our HDMI output settings. The current output resolution is set to 2160p or 4k. I'll click down to advanced and make sure external recording control is on. I can also change the output data depth from 8-bit to 10-bit—I'll choose 10 bit and I'll make sure to have my n log setting turned on for more flexibility and color grading in post.
There are several different focusing modes. I'll click on the I and click down to AFS and I'm set to autofocus single. Now I'll turn on touch autofocus and make sure that's on and I'll just touch to focus. Now if I click on the eye again I can select full-time autofocus. For this mode, make sure you're out of focus area is set to wide. Now when I click to focus, the camera is going to track the object.
Once you plug in the HDMI cable into the Ninja V, click on the top left corner and make sure your input is set to HDMI. Make sure that HDMI trigger is set to on and that your camera output is set to on. We can change our record settings by clicking up here and we can change the codec between pro res and DN xhr. On the bottom of the Ninja V are a couple of different view modes. There are waveforms, color waveforms and focus peaking. The settings menu is in the bottom right-hand corner. Here you can apply any preloaded lots if you.
Click on monitor you can view your footage in different color spaces. If you click the record button on the Moza Gimble, it will trigger the Ninja V to start recording. You know it's recording if you see a red border around the outer frame of the screen if you swipe up on the screen the display info disappears. Now you're ready to start filming.