
The Pro Effects Kit - maybe you have one or maybe you are thinking about getting one. Either way, this post was designed to address our customers' most frequently asked questions about this kit. It was a tough job, but I convinced a few of my Lensbaby co-workers to accompany me to the Oregon coast so I could spend the day using the Pro Effects Kit. My idea was to document our day using all the tools in the kit and then post a few photos to show how you can shoot a variety of subjects using the two optics and the Macro Converters, explain what the differences are between the two optics, and show you can have a lot of fun in the process!

What's in the Pro Effects Kit?
The Composer Pro is your lens body, and it houses whichever optic you choose to use. The Sweet 35 Optic (35mm focal length) comes installed in the Composer Pro, and it will give you a circle of focus surrounded by blur. The Edge 80 Optic (80mm focal length) will give you a slice of focus through your image bordered by blur. The Macro Converters come in two parts - one 8mm converter and one 16mm converter. They sit between the lens body and optic. Hint: They can also be stacked together for an even closer view.


Your Lensbaby is a unique tool with lots of creative possibilites. Use it to add energy, a feeling of motion and fluidity and even nostalgia into your story.
The Sweet 35 Optic gives me a tack sharp spot of focus to capture environmental portraits of friends and the vast landscape around me. I typically set my aperture to f/5.6 when shooting portraits because I want their face to be in sharp focus but still have enough dreamy blur on the edges. The Edge 80 Optic allows for a totally different look with its tack sharp slice of focus through the image and a soft, more subtle blur on the edges.

Both the images above and below were shot with the Sweet 35 Optic at f/5.6.

Watch out for sharks!


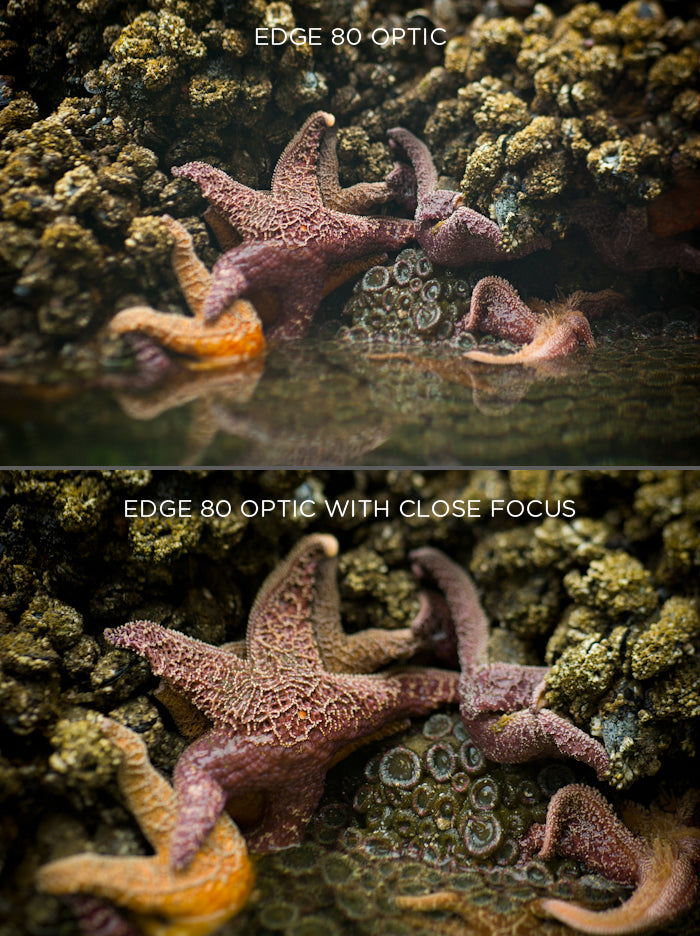
Make the most of your Edge 80 Optic with its long focal length, close focus function, and the ability to manipulate your depth of field with just a little tilt of the lens.
The Edge 80 Optic is very versatile when used correctly. The long focal length allowed me to capture my friend surfing while also creating a miniature effect. In the photo below I tilted the lens up, which created a horizontal line of focus on the bottom.

For the portrait below I wanted a vertical line of focus, so I tilted the lens left to right and rotated my focus until my subject was sharp.

You can even place the line of focus diagonally. Experiment with the tilt and have fun with it!

Pull out the close focus element on the front of your Edge 80 Optic to get up close to your subjects.

Whether you want to see wide, far, or up close, the Pro Effects Kit offers limitless possibilities.
The following comparison images were shot at f/5.6 with both the Edge 80 Optic and the Sweet 35 Optic.

Make sure to use those Macro Converters to capture the smallest details.

Still not sure how to change optics and accessories? Here are three short, helpful videos on how to install and remove your Edge 80 Optic, Sweet 35 Optic and the Macro Converters.
Ready to purchase? Visit our pictureline.com to get your Lensbaby supplies today!