
Who is Gary Bremner Photography?
My name is Gary Bremner and I am one-half of GBP, a photography team based in Whitehorse Yukon, which is located next to Alaska (thats how we describe it to everyone not from western Canada). When people find out we are full time photographers in the north, the first thing they say is "wow you must have some great images of northern lights, hunh?" The truth is that I have never taken a single northern lights or wildlife photo in the 8 years that I have been living here...unless you count the shots of our Newfoundland dog Bill Murray as wildlife. Like most people, I started out taking pictures of what was around me—mountains, trees, plants—but it wasn't until a friend asked me to take some photos of her for a play that I knew what I actually liked to take photos of. I love photographing people. You see, I thought that living in the Yukon, I needed to take pictures of Yukon things. After all, people come here from all over the world to take pictures of those things. But it turns out that it wasn't until I started working with people to create an image together that I really fell in love with photography. So now, 7 years later, I have a full-time business with my wife Brianne photographing all things people related.
Photographing in the Music Industry
One of the subjects we shoot a lot are bands/musicians. One of the cool things about the Yukon is the fact that there are a bunch of really talented people up here. Not sure why they migrate here, but they do.

The music industry has changed a lot in the last decade or so. It used to be that the majority of a band's revenue came from their album sales, and a band toured mainly to help sell that album. Now, they make their money from touring, and the album helps sell tickets to those shows. One of the things that hasn't changed, though, is the fact that every serious band needs a good press kit. The press kit will usually consist of some pics of the band as well as some head shots and then other things like gear requirements and, of course, a bio. This info helps promoters, managers, and publicists set-up, advertise, and sell tickets to those shows.
Our role at GBP is to make sure we create imagery that is consistent with the band's "brand." After all, a band is just a business selling a product, and that product happens to be their music. So we want to make sure that we have imagery that will help sell that product. Concert promoters will usually use those images to create the show posters, so we make sure to deliver a few different options and orientations. Sometimes the images will be used for album art work as well, which has its own considerations, like composing for square format or to make sure to get small detail shots for inside artwork etc.


Old Time Machine Press Photo
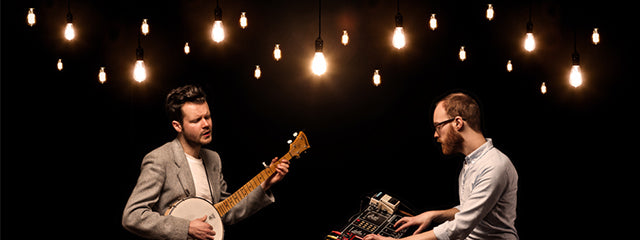
Old Time Machine is a emerging Canadian indie band that is very much a combination of "old-timey" banjo type feel with all sorts of looping and electronic gadgetry mixed in. They came to us with a need for good quality press photos that would help them stand out and get noticed as they toured throughout North America.

Concept
We talked for a while about what they wanted their look and feel of the images to be. I like to always ask the band what image they are trying to portray, because that will dictate a lot of what we do for the shoot. One of the reoccurring things that came up in our conversations was the mention of the look/feel of Edison style light bulbs (those old-fashioned clear light bulbs with the crazy filaments) and simple black negative space. As the band is a unique mix of electronic and banjo/guitar, we wanted something that really highlights their mix of new-age and old school. Being the middle of winter in the Yukon, this concept worked well for me, as when it's super cold outside, it can be a big limiting factor on what we can do. So, an indoor studio shoot was a perfect fit.
The Shoot
I knew that trying to fit these two guys and all of their gear into our small studio space at the same time would be impossible, which meant a composite, and the black space would be perfect for that. So the black space would be easy, but I wasn't sure what we’d do with the light bulbs. Trying to shoot with the light bulbs as a light source would be difficult as we could only get two 60W bulbs, and I didn't want to push the limits of my camera too far and then have a bunch of noise I had to clean up later. So, I decided to scrap the bulbs during the shooting process and put them in post, knowing I’d need the lighting to still look authentic.


I shot Kyle and Ryan, the band members, separately so that I could choose the best shot from each person, as well as just concentrate on lighting one person at a time. I shot on a Canon 5dmk2 with a 85mm F1.8. The lighting set-up was pretty simple. I knew that I wanted to emulate them being lit by these Edison light bulbs from over head, so I used one strobe over top of the subject with a shoot-thru umbrella (a gridded soft-box would have worked better to control the spill onto the background, but I didn't have the ceiling height at the time to allow for it). I also used two bare strobes behind and back a little to create some separation of the subject from the background. The camera was locked down on a tripod and was never moved so that that nothing changed from subject to subject to ensure that the composite looked real.
The Gear
- Canon 5dmk2
- Canon 85mm f/1.8
- 3 Alien Bee BB800
- Westcott shoot through umbrella
- Pocket wizards
- C-stands
- Black seamless on Manfrotto autoploes
Post Production (Band)
Because of the umbrella spilling light all over the background, my black seamless wasn't black at all—in fact, it was a lovely medium grey. To fix this I used the Burn tool set to shadows and carefully burnt every bit of not-black background around every tiny little nook-and-cranny (took forever!). A good tip to help with this (and to make sure your background is either totally black or totally white) is to add an Adjustment Layer-Levels and then crank either the left most or right most sliders so you clearly see what’s white/black and what’s not.
Post Production (Light Bulbs)
The light bulbs were another story. I rigged up a socket and a cord to plug them in, but again, I only had two bulbs to work with. I had decided that I wanted to have a "roof" of lights over top of the guys, but only having two bulbs to work with, I would have to work some Photoshop magic. I ended up photographing the two bulbs separately in front of a black back drop.
The post-production of the bulbs was fun. I found that the best way to get them off of the background so I could place them in my composite was to open them as a Smart Object, then select them using the Select-Color Range-Highlights function. This allowed me to just grab the "brightness" of the light and not take any of the background. Instead of cutting out the section, I masked off everything but the selection. This way I could keep the Smart Object function to create different "brightness" levels to simulate different bulbs.
The key to all of this was making sure that all of the different bulbs were own their own layers and that the layers’ blend modes were set to Linear Dodge (Add). This was the coolest part. By doing this, the bulbs actually interacted with each other and made whatever was near them brighter, just as real bulbs would do! Then by duplicating these two bulbs and varying the camera-raw exposures and sizes, I was able to create a sense of size and distance. The rest was pretty straight forward. I just put all the pieces together and fixed the colour temperatures so everything was nice and warm (as it would be with those old-school light bulbs).
That's pretty much the whole precess on how we did the Old Time Machine photo. In the end, we were pretty stoked with the results!