
We came across Johnny Tergo's Passenger-Side Window project last week and knew we had to share it with you. Johnny has put a refreshing new spin on street photography by creating a phenomenal rig in his truck that allows him to take candid street photos as he sits in traffic. If that's not the best use of traffic downtime, then we don't know what is. We asked Johnny to share his project with us and tell us a little bit about how he does it. Johnny was kind enough to share these details with us, and we're glad to have him. Be sure to follow him on Instagram to keep up with him on the daily!
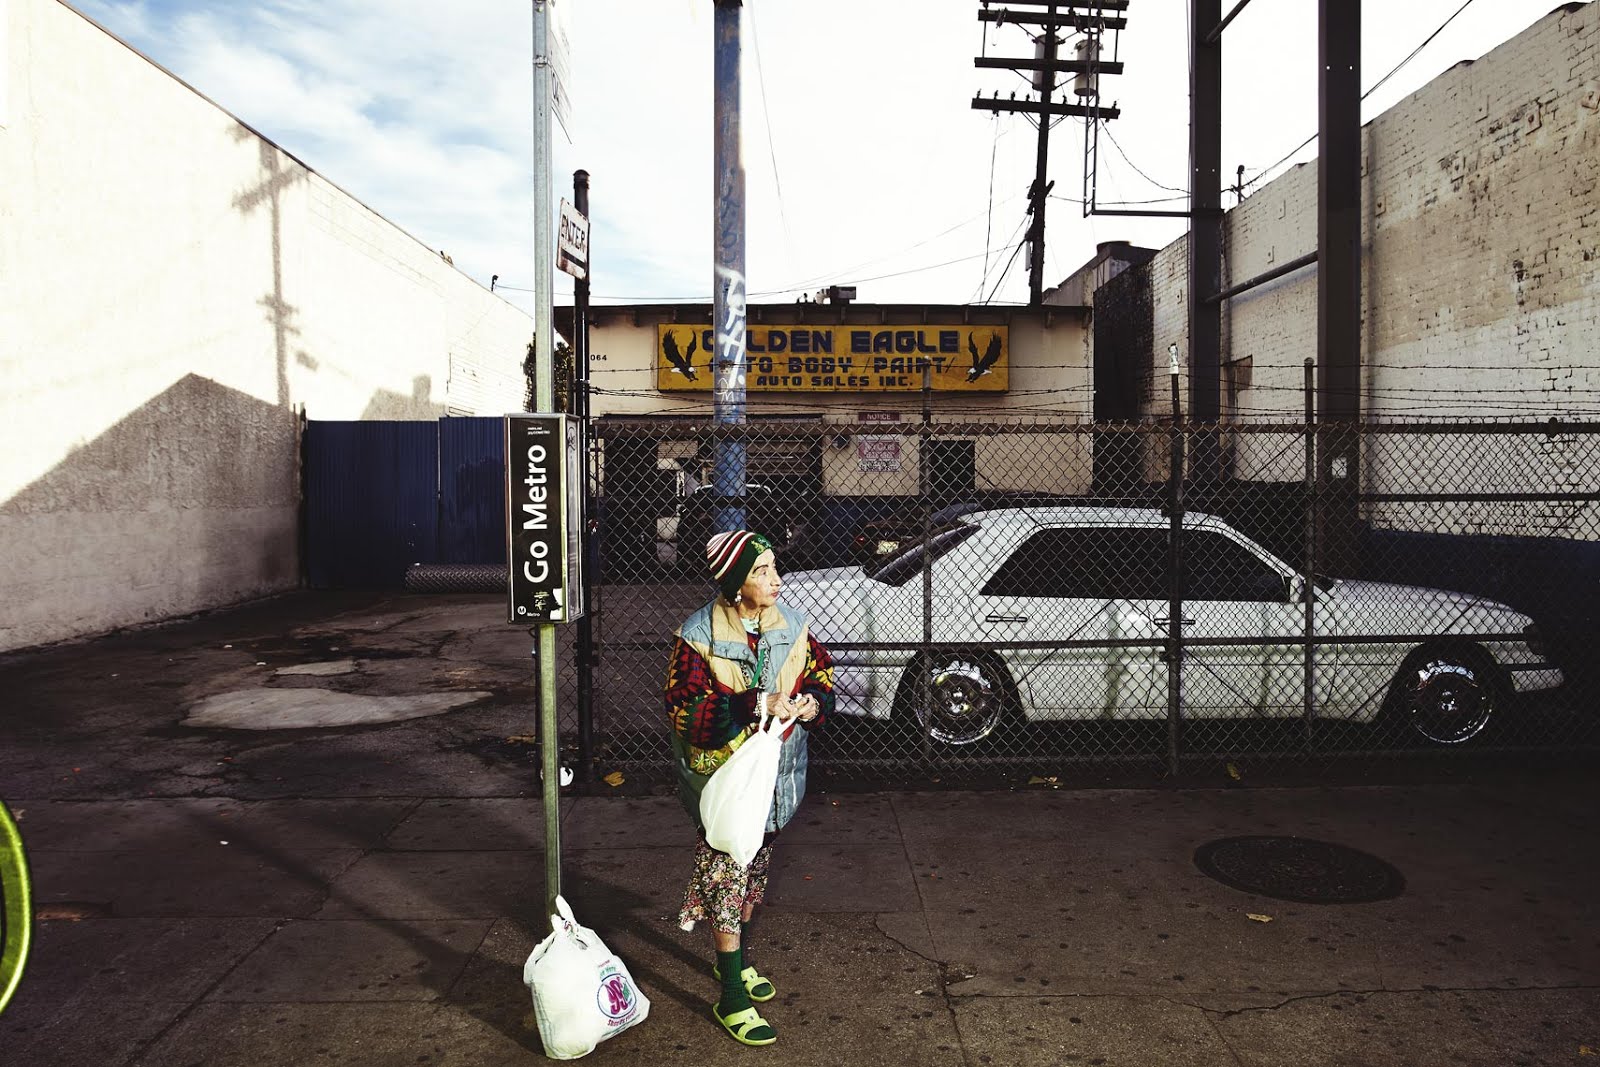
I spend a lot of time in my truck commuting to and from work. During these periods I am often sitting in dense traffic, sometimes on crowded city streets. I see interesting people in interesting locations, and I want to make images of these people in the streets just as I see them.
I first started by fastening my iPhone to my passenger side window with a Woods Suction mount and triggering the iPhone camera with the volume button on the iPhone earphones. I captured a few images this way, but I felt limited by the trigger mechanism. I felt the headphone cable was too short to allow me to sit comfortably and trigger the phone without making it obvious to people on the street that I was about to take their photo. I had the thought that if my volume button was triggering the camera shutter, I should be able to connect an Apple bluetooth keyboard to the iPhone and use the volume button on the keyboard to trigger the camera shutter. It totally worked.
![]()

Once I figured out the wireless trigger for the camera, I was able to sit comfortably in my truck and actuate the shutter without tipping my hat to my subjects that I was going to take their picture. I would be driving along in traffic, see somebody interesting on the sidewalk, and pull up next to them without looking in their direction. When I would sense that they were either looking at the phone mounted on my passenger side window, or if they where just walking past, I would trigger the iPhone without looking in their direction so that I could capture the moment without apprehension on their faces. I got a few images I really liked, and I then started posting these images on Instagram for my friends to see. I got a pretty good response and was really enjoying the genuine feel of the images, but I decided that I wanted to have higher resolution images and also wanted to be able to control the lighting so that I could introduce my own aesthetic. This is why I built the rig in my truck and mounted the camera and light in the passenger seat.

The rig was a pretty slow process, and I by no means had a master plan or blueprints for the final design. I first started by bolting a 12" x 12" x 3/8" aluminum cheese plate, with two speed-rail fittings attached, to the frame of my truck through the passenger-side floor board. This gave me a solid base to build off of. The first few pieces of aluminum pipe that I mounted to the speed-rail fittings were placed so that I could mount my camera. This rig eventually grew little by little as I figured out different things I wanted to progress the project. It now houses a DigiPlate for my MacBook Pro, a DigiPlate prototype that holds my iPad mini, a couple of different mounts with 5/8" baby pins for mounting strobe heads, and the camera mount.


The entire system is made up of the following tools:
- MacBook Pro laptop running Capture One
- iPad mini running Capture Pilot (adjust camera settings)
- iPhone running Capture Pilot (another point to adjust camera settings and review shot frames)
- Apple Airport Express (to create a robust network for the Capture Pilot App)
- Canon 1d MKIV (no particular reason for the Mark IV. It's just what I have available, and I like having the 1/300th x-sync)
- 4 Pocket wizards (One set to trigger the pre focus and fire the shutter with a remote cable, and the other set connected to the camera and Profoto Strobes)
- 2 Profoto 7a 2400 strobe generators (with all the gels I use and shooting in full sun most times I need all the power I can get. I am also limited by the 1/300th second maximum x-sync on my camera. Most of my daylight exposures land in the range of f8 - f11 at iso 100, so that strobe is usually cracked up pretty intensely.)
- 2 Profoto Pro Heads
- My modifiers vary (For the most part I like using a standard Profoto 7" reflector mounted directly next to my lens as a fill light. This reflector usually gets a piece of bleached white muslin over it for diffusion and a non-comlimentary colored gel based off the color I choose to use on the main light. For the main light, my current go-to modifier is a Profoto Magnum reflector. This modifier gets mounted in the back of my truck and is about 9'-11' off the ground. I need something that is resistant to the force of wind and not easily moved. When properly mounted, this reflector stays put. On this modifier I usually place some sort of color and some sort of warming gel. Either 1/2 CT Straw, 1/4 CTO or my favorite Cosmetic Highlight.)
- 2 Honda 2000 generators (One per Profoto strobe generator)
- A good assortment of Brahms or Beethoven.

![]()
![]()
Safety is very important to me. I take great care to ensure my driving is not impeded by anything in my truck. My concentration is always directed to my driving first, and only when possible and safe do I pull to the side of the road to make an image. When people see my set-up from the outside and don't know how it works or how I operate it, they get very intimidated by it and assume that it is very distracting to me as a driver; however, I have gone to great lengths to make this very safe. I set everything beforehand, and it is as simple as actuating a single button on a pocket wizard when it comes time to shoot.