
Avengers. X-Men. The Incredible Hulk. Amazing Spider-Man. Daredevil. Superman.
We all have our favorite comic books and comic book characters, so when we heard Comic Con was coming back to Salt Lake City, we knew we had to be a part of it. The pictureline crew will be at Salt Lake Comic Con at Kid Con to take photos of you and all of your favorite characters. See more on our events page, but in the meantime, try using Photoshop to add a comic book look to your favorite photos. Follow these steps and we’ll see you at Kid Con!
Here’s the image we’re starting with:
 Original Image
Remember: Don’t forget to add a new layer once you complete each step!
1. Increase Contrast
Increase the overall contrast of the photo by burning it somewhat. Go to Image > Adjustments > Levels, and then play around with the best settings for your photo. This will help when we add a halftone print effect in Step 3.
If you’re using Lightroom, you can also try these tips and use the Tone Sliders to add contrast and adjust the image further.
2. Add a Film Grain
To achieve the grainy comic book style, you’ll need to add a film grain to your image. Add a new layer to your image, and then fill that layer with 50% gray. Use the blend mode, add noise, check monochromatic, and play around with your settings. Watch this step-by-step tutorial from one of our pictureline bloggers, Nicole S. Young, for more detailed instruction on how to add film grain.
You can also add a preset grain filter in Photoshop. Follow this path: Filters > Artistic > Film > Grain. Again, try different settings that suit your photo.
 Photoshop Tips: Comic Book Look - Film Grain
3. Apply Halftone Print Effect
Duplicate the layer and rename your new one. Adding the halftone pattern will really help achieve the old comic book print look. To apply a halftone pattern, go to Filter > Pixelate > Color Halftone. Set a Max Radius of 4, and leave the others with the default vales. Once you’ve hit OK, use the Layers Palette and the Blending Mode to darken your photo.
 Photoshop Tips: Comic Book Look - Halftone Print Effect
Here are more great tips on how to add halftone effects.
4. Introduce Comic Book Elements
Now it’s time for the fun part. Add fun characters or stylized effects to your photo to make it more comic book-esque. As you can see here, we added this photo of the cowboy by adding another layer and repeating Steps 1-3 for the cowboy image.
 Photoshop Tips: Comic Book Look - Comic Book Elements
5. Add Captions or Speech Bubbles
Speech Bubbles - To add speech bubbles, select your Elliptical Marqee Tool, be sure to hold down shift, and make an oval or circle. Then use your Polygonal Lasso Tool, hold down shift again, and make an arrow-type shape. You should see moving dotted lines, right click, select Stroke, and choose your color of outline (probably black). Lastly, use your Paint Bucket Tool to fill in your speech bubbles, most likely with white.
Captions – To add rectangular boxes, like the one in the photo below, draw a small rectangle on a new layer. Give it a Stroke of 3 pixels and paint it orange or yellow.
Fonts – We used Ariel in all caps, but if you’d like to achieve a more comic book type font, you can download Digital Strip. This download offers more fonts that create that old school look.
 Photoshop Tips: Comic Book Look - Captions
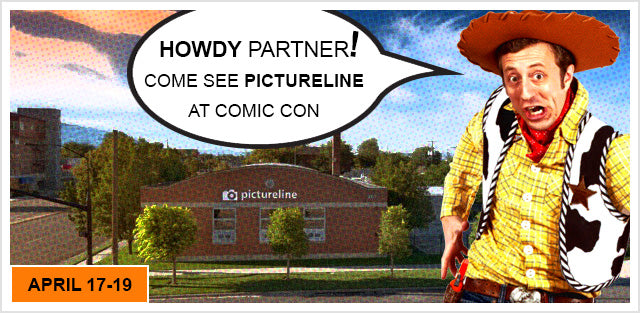
6. Finish with a Stroke Border
To add a comic book border, select your entire image, and go to Edit > Stroke. Select your color and pixels. We went with white and 10px, but do what looks best with your image.
 Photoshop Tips: Comic Book Look - Stroke Border
And here’s our final image! What does yours look like? See you at Comic Con and Kid Con!