
When working up an image in the Lightroom Develop module (or in any raw processing software), the white balance settings are a critical part of the puzzle. If you want your images to look neutral, i.e. without a color cast, then you have to nail down the white balance and it has to be extremely accurate.
I would guess that most photographers shoot in "Auto" white balance mode. I find myself in "Auto" white balance mode often, especially when outside shooting on partly cloudy days. As you might expect, some cameras are better at judging white balance than others. That being said, I haven’t seen any cameras that are dead on all the time. Hence, when shooting portraits or images where the skin tones or colors are critical, I often set custom or preset white balances in the camera that are created using a gray card. This at least dials in the white balance to a very accurate degree and keeps me from going insane adjusting the white balance sliders in the Basic panel.
Dialing in the White Balance
I will say it again. If you don’t dial in the white balance while working up an image the color may never look quite right. Dialing in the white balance takes a very well-calibrated, high-end monitor and well-trained eyes that can see very slight color shifts. Also, it is a good idea to figure out if you are color blind, as this will affect your sense of color significantly. Of course you may intentionally create a wild or off-kilter white balance in your image as an effect, which is totally fine, but here we will discuss dialing in the white balance so that it looks like the scene that was photographed or as close to that as possible.
Below are the before and after versions of an image I worked up last fall. Photo 1 is the before image and Photo 2 is the after image. You can see how the white balance was adjusted farther down in Photo 3. Before we get into how I adjusted the white balance in this image let’s first talk about how to adjust the white balance in general.

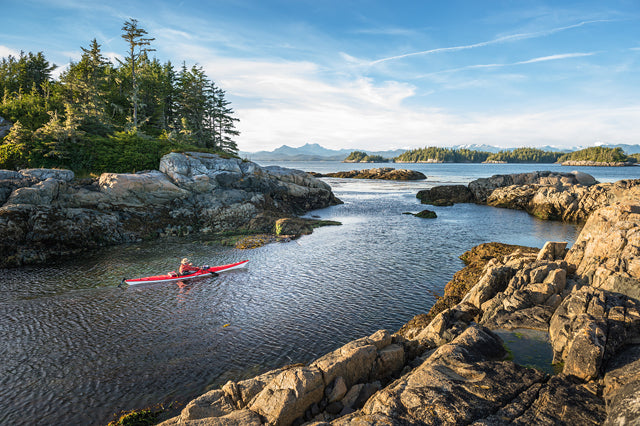
Here is our sample image as it came into Lightroom.

This version of the same image has had extensive adjustments, but of note for this blog post is that the white balance was changed from a temperature of 5500K to 6383K. Note that the Tint was left at the same setting as when the image was imported.
White Balance Tool in Lightroom
The white balance tool in Lightroom is exactly as it is in Adobe Camera Raw (ACR), as highlighted in Photo 3. In the upper left corner of the white balance dialog you have an eyedropper tool so that you can sample parts of the image (or an X-Rite Color Checker Passport) to alter the white balance. I do not recommend using the eyedropper tool unless you have a neutral 18% gray object in your image. Sampling different parts of the image to set the white balance is akin to fishing with dynamite—it is highly unlikely you are going to get the results you are looking for. Alternatively, you can adjust white balance with the Temperature and Tint sliders. Lightroom has colors behind the White Balance sliders. These colors show, in a very basic way, how the sliders affect the color balance in the image. Also note that there is a white balance preset toggle in the upper right corner of the white balance section. The options available in this toggle include the normal suspects: As Shot, Auto, Daylight, Cloudy, etc.

Here is a close up view of the before and after Basic panel settings for this image. The white balance settings are highlighted in red. Also, note that when adjusting the white balance, when you move the sliders the toggle in the upper right corner changes from "As Shot" to "Custom."
White Balance Sliders
The method I use with the White Balance sliders is to move each slider back and forth continuously to extremes, first with the Temperature slider and then with the Tint slider. As I adjust the sliders slowly back and forth, like a pendulum, I watch the image and I can usually pick out the optimum setting without too much trouble. Just like a pendulum that is left to itself eventually comes to a stand still, I slowly zero in on the optimum white balance settings with both sliders.
"Lights Out" Feature for White Balance
One of the tricks I use is the "Lights out" feature when adjusting the white balance. To access the "Lights out" feature tap the "L" key a few times. There are three modes to this feature: off, dim and black. By using this feature in the mode where it dims everything but the image, it is possible to adjust the white balance without having the rest of the interface compete for your attention. I also use this feature when adjusting the Exposure slider. Once I have my white balance dialed in, I then toggle to Daylight, As Shot and Auto to compare it with other options. Doing this will give a good sense as to whether or not the custom white balance is accurate or not.
White Balance Pendulum Technique
Coincidentally, I learned the white balance techniques that I have shared here from George Jardine, who used to be the Lightroom Evangelist for Adobe and a member of the Lightroom team. He suggested the pendulum technique to me, and it is the best technique I have seen for getting an accurate white balance. I also want to note that adjusting a white balance setting is difficult to assess unless you compare it to other white balance options. Hence, this is why the pendulum technique works so well because you are comparing the white balance to other possible options and choosing the one (out of many options) that looks the best.

Here is the finished image. For this image, the white balance is dialed in for the last light of day. Note that I also evened out the tones in the image, especially the sky, which was much brighter than the foreground.
Above is the finished image. I altered the white balance settings to warm the image up slightly since this image was shot with the last light of the day. As you can see in Photo 3, I only changed the Temperature from 5500 K to 6383 K. For this image I worked with both sliders, but found I only needed to alter one of them. Also, note that the Temp slider adjusts the blue/yellow hues while the tint slider adjusts the green/magenta hues in the image. With the temperature slider we are cooling or warming the image. With the Tint slider we are typically removing color casts. Hence, often you will adjust one slider then go back to the other and so on until you get the white balance dialed in. Sometimes this process can take ten minutes, especially if you shot under whacky fluorescent lights indoors.
Please understand that telling you how the white balance sliders work isn’t going to mean that you can adjust it in a snap. It will take time to learn how to adjust white balance mostly because you have to fine-tune your eyes to see color accurately. Even after 10 years of working up digital images, I still find adjusting the white balance to be one of the hardest parts of post-processing. If you have trouble with setting your white balance accurately, I cannot recommend enough that you purchase a Lastolite EzyBalance grey/white card and that you use it to set custom white balances in camera.
 This blog post is a modified excerpt from my e-book, Adobe Photoshop Lightroom: A Professional Photographer’s Workflow. For more information on this e-book or to purchase the e-book please visit my website.
KEEP UP WITH MICHAEL:
Website | Blog | Workshops | Facebook | Twitter | Instagram |
Google+ | Behance