
David Keochkerian is a physiotherapist from France, and while he calls himself an amateur photographer, his images are anything but. Today, we asked David to talk about his stunning infrared photography, which has been featured in Photography Monthly. Infrared photography is a unique form of photography achieved by using a special camera or filter that blocks out all light except the infrared waves, creating an ethereal and often dreamlike look.
I first discovered infrared photos in 2010 on flickr. I was immediately captivated by the poetry and the fantastic atmosphere that emanated from these images. After some research, I realized that my D700 was not ideal for infrared photography, so I bought a Nikon D70 and an external IR filter on ebay. From there on out, I was ready to start my IR adventure.

DAVID'S EQUIPMENT
I started with a Nikon D70 IR and an external IR filter. I quickly became more demanding of my pictures as I got more practice, so I modified my D70 with a 720nm internal filter at lifepixel.com. I was not disappointed. I was able to regain normal exposure times, which drastically cut down the noise on my RAW files—a major problem on the D70 as soon as exposures times got longer. I still had the problem of low resolution files, however, but I was very lucky to get a D700 from my brother. Since I had a 720 nm filter on my D70, I chose a 590nm filter for the D700.
TIPS AND TRICKS
Before starting out, I did a lot of research on infrared photos and discovered the following key points:
- Setting the correct white balance is crucial.
- Because the IR filter is very opaque, exposure time is significantly extended, making a tripod and remote mandatory.
- Start with shooting on a sunny day for best results.
- And finally, find a place that lends itself well to the infrared—somewhere with a lot of green leaves.
Knowing these tips, I quickly obtained satisfactory results. The best seasons for infrared photography are spring and summer as there is plenty of green foliage and sunny weather. I especially like the places where trees can be reflected in a pond or lake and where the landscape is predominantly green.
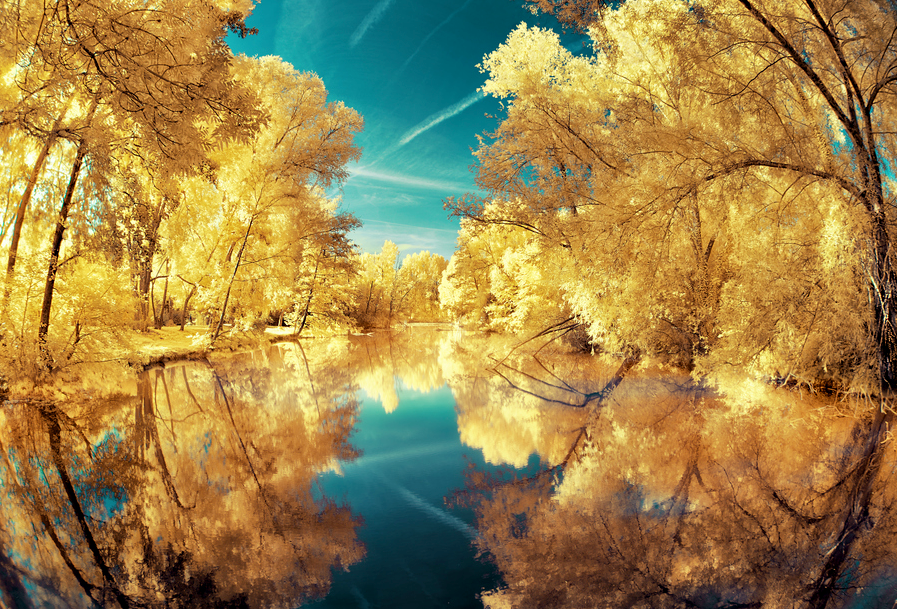
HOW DAVID GOT THE SHOT

For the shot above, I made a bracketing of 9 images +/- 0.67IL. My settings were as follows:
ISO: 100
Shutter Speed: 1/125s for the reference image (1/800 (-2.67IL), 1/500 (-2IL), 1/320 (-1.33IL), 1/200 (-0.67) ; 1/80 (+0.67IL), 1/50 (+1.33IL), 1/30 (+2IL), 1/20 (+2.67IL))
Aperture: f/6.3
Lens: 16mm fisheye
White Balance: Automatic. It's not possible to set a custom white balance on the D700 with an internal IR filter! You have to shoot RAW images and adjust the white balance to your liking in post production. Photoshop is not recommended for this. The OEM RAW conversion softwares, like Nikon Capture NX2 and Canon Digital Photo Professional, do a much, much better job—often times even better than setting the white balance in camera.
POST PROCESSING
 First you have to fix the white balance. I use Capture NX to do this. Go to Camera Setting > White Balance > Set Color Temperature and choose Set Gray point > Check Marquee Sample > Click Start and then select the overall image with the eyedropper. Then you just have to save it as a tiff and open it in Photoshop.
In Photoshop, I made a manual blending of 4 exposures: 0IL is my reference image, -2IL for the sky and some part of surexposed foliage, +2IL and +2.67IL for the reflection. I open my 4 images in the same document so that I have four layers. My base layer is my frame 0. I begin with the sky. I select the layer -2 and click on the tab mask by holding down the alt key. The layer becomes inactive. Then I paint the mask with a white brush to bring up the information layer of -2 in the place that I want. I start the manipulation to reflect with layer 2 and 2.67. Then I swap color channels of the blended image to have the IR color effect. The sky becomes blue and the foliage a kind of yellow/orange with a 590nm filter and white with a 720 nm filter. Lastly, I fixed the contrast with curves and luminosity masks, color tones with selective color, and increased details of the foliage.
Infrared photography opens you up to a whole new world of possibilities. The fantastic mood of infrared images has always amazed me, and once you start, it's absolutely addictive.
