
This is an excerpt from Chapter 3 of Michael Clark's e-book Adobe Photoshop Lightroom: A Professional Photographer’s Workflow. Chapter Three is titled "Importing and Editing Images in Lightroom," and it covers how to set up your Lightroom preferences, import images into Lightroom, using the DNG file format, editing your images, renaming images, file and folder naming, shooting tethered and many other topics including this one. The e-book is available on Michael's website. Click here to read more about the e-book and to purchase it.

It seems many people are finding Lightroom to be a bit slow, which I find rather curious since I have had the opposite experience, especially when I compare my current Lightroom workflow to my older Adobe Camera Raw workflow, which seemed glacially slow by comparison. In Lightroom 4, the Adobe engineers have really worked hard on making the software run faster than ever before, and I can see it. Even so, here I’ll offer up a few insider tricks, tips, and techniques that will enable Lightroom to run as smoothly as possible.
1. Hard Drive and Scratch Disk Space
First off, check to see that you have at least 50% of your hard drive space on your computer available. If you are working with a hard drive that is more than 75% full (i.e. you only have 25% or less of your hard drive memory left) that can slow down all applications and especially Lightroom. And of course, a fast computer is also a major factor, but Lightroom will work on any computer with Mac OS X 10.4 or later.
2. RAM and 64-bit processing
Increasing the amount of Random Access Memory (RAM) on your computer will greatly help as well. Lightroom is a RAM hog, and even 10 GB or more is not too much. With Lightroom, you can also take advantage of 64-bit processing if you have more than 4 GB of RAM, and both your computer and operating system support 64-bit. For Mac users, you’ll need to have an Intel-based computer, and you’ll need to be running OS X 10.6 (Snow Leopard) or OS X 10.7 (Lion). Lightroom now runs natively in 64-bit mode, so there is no need to turn this feature on. It is on all the time. And I’d bet this is, in large part, an explanation as to why Lightroom runs a fair bit faster than older versions of the software. This feature alone might be worth the upgrade to a new machine if your computer does not support 64-bit processing. For PC users you’ll need to have a 64-bit compatible machine for Lightroom to run natively at 64-bit.
Ultimately, the faster your computer, the faster Lightroom will function. If Lightroom seems like it is dragging and you have a computer that is three years or older, then it might not have anything to do with the software—it might just be that your computer is slow. I have an Apple Mac Pro Tower with 16 GB of RAM, and Lightroom runs relatively quickly on this machine. At a minimum, I would say to have at least 5 or 6 GB of RAM in your computer. For Mac users, I would highly recommend buying more RAM from MacGurus.com if you need it. They have top quality RAM that is thoroughly tested. For PC users, I would suggest buying RAM from a reputable dealer since defective RAM can be the cause of many problems. RAM is fairly inexpensive these days, so, if possible, I would suggest adding as much RAM as you can afford. It will make Lightroom run much faster and allow you to have multiple applications open at the same time without any delays.
3. Render 1:1 Previews on Import
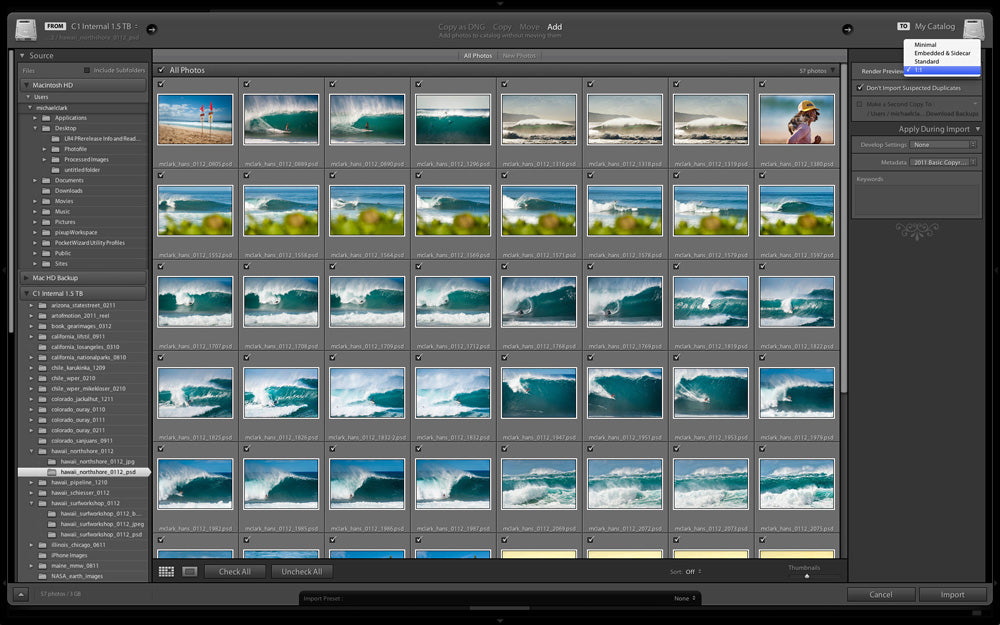
Another way to make sure Lightroom is running as it should is to render the 1:1 previews either during the import phase or right after importing images into Lightroom. It doesn’t happen automatically, and this will greatly speed up everything in Lightroom. This is a little known key point to a fast workflow in Lightroom, and I suspect it is also the most common reason why many folks find Lightroom slow. Building 1:1 previews isn’t as fast as any of us would like it to be, but with a little patience, the rest of the workflow will be a lot smoother. The easiest way to build the 1:1 previews is during the import stage (as shown in Figure 1).

There are three different types of preview images built within Lightroom. The Minimal previews are the thumbnails in the filmstrip and grid mode. The Standard previews are the screen size images. And the 1:1 previews are the full size images at 100%, which are basically the same thing as zooming into an image at 100% in Photoshop.
The easiest method to render the 1:1 previews is to choose 1:1 in the Initial Previews toggle in the import box so that the previews are created during the import stage. By choosing 1:1, the Minimal and Standard previews will also be made. Hence, all of the previews will be ready to roll once the import process is finished. If you don’t want to render the 1:1 previews for all of the images, I’d suggest rendering the Standard previews on import, then after you have done an initial edit (with the Standard—i.e. screen size previews) you can render the 1:1 previews of your select images for the final edit.
To render the 1:1 previews after the import process, first select all of the images in the folder (in the Library module) or the group of images that you would like to render the 1:1 previews for and then go to Library > Previews > Render 1:1 Previews.
4. Set Your Preferences
In the Catalog Settings preferences (Lightroom > Catalog Settings) you can adjust the standard preview size that Lightroom builds from 1,024 pixels wide to 2,048 pixels wide. The setting you choose will depend on your monitor size. You can also adjust the Preview Quality (High, Medium and Low).
By adjusting these toggle boxes you can optimize Lightroom for your computer and monitor. I have Lightroom set to create standard sized previews that are 2,048 pixels wide for my Eizo ColorEdge CG243W display because it has a screen resolution of 1,920 x 1200 pixels. I also set the Preview Quality to High so that I can see the best quality preview as I edit images. Since I have my preferences set to the higher settings, it slows Lightroom down just a little, but with 16 GB of RAM in my Apple Mac Pro, it is a small difference, and I prefer the higher quality previews. On my laptop, I set the previews to 1,440 pixels wide as that is the closest setting to match the width of my Apple MacBook Pro’s 13-inch monitor. And since my MacBook Pro has only 4 GB of RAM, I set the Preview Quality to Medium instead of High, which massively speeds up Lightroom on my laptop.
5. Optimizing the Lightroom Catalog and Connection Speeds
The Lightroom catalog can be "optimized" if things seem to be running a little slow. To optimize the Catalog, go to File > Optimize Catalog, which, in theory, should make everything run faster. Selecting this option will close Lightroom so the catalog can be worked on, and then it will reopen it when it is finished.
If you have your images or the Lightroom catalog on an external hard drive (USB or Firewire) this can massively slow down everything in Lightroom as it is limited by the connection speed of the hard drive. I would suggest putting the main Lightroom catalog on a faster drive with a SATA or Thunderbolt connection if possible. Or, better yet, leave it on the computer's main internal drive. This is one of the major factors in how fast Lightroom performs.
6. Embed Metadata and Keywords on Import
In my workflow, I have found that Lightroom works very well with Metadata and Keywording, but if you need to alter large groups of images, the software can drag a bit as you try to type into the metadata fields. This is less of an issue with Lightroom 4, but the fastest method I have found for importing metadata and keywords is still to do it as you import the images.

In the Import dialog box there is a field for typing in keywords, and the Metadata toggle just above it allows you to create custom metadata templates, which can be edited quite easily. I have several metadata templates I use. If all of the images are of the same person, scene, location and sport then I create a custom metadata template with all of the metadata in it, so once the images are imported, the metadata and keywording is finished. If I am importing a group of images with different people, locations, or sports then I will just use my basic copyright template (Figure 2) during import—along with the relevant generic keywords. In this second scenario, once the images are imported, I’ll select groups of similar images and type in the metadata and captions for each group or create metadata presets to apply to groups of images.
Review
If you don’t render the standard-sized or 1:1 previews, then Lightroom is constantly trying to build them as you edit your images resulting in very slow performance. And if your Lightroom Catalog is on an external USB or Firewire hard drive, this to will handcuff Lightroom and impact it’s performance greatly. In a similar manner, if you are working with an internal drive that is almost full, Lightroom’s performance will be hindered because the scratch disks that are needed when the RAM is maxed out are virtually non-existent. I would also advise having at least 4 GB of RAM in your imaging computer, which will allow for access to Lightroom’s built-in 64 bit processing. Lastly, don’t forget to optimize the Lightroom catalog every so often to keep things humming. Adapt these tips to your Lightroom workflow and you will be amazed at how efficient and fast Lightroom can be. And if that isn’t enough, buy yourself a serious amount of RAM, and then Lightroom will really start to motor. I recently worked on a brand new 12-core Apple Mac Pro with 32 GB of RAM, and Lightroom never hesitated for anything. Even exporting 100 images took very little time.
Also, if you start to see Lightroom crashing often, you may have some RAM issues in your computer. I have had several peers recently deal with some serious computer issues, especially because Lightroom and many applications like it rely very heavily on the computer’s RAM. The cause of their computer crashes and other issues was not the Lightroom software itself, but a case of bad RAM chips. Once they replaced the RAM, all of their Lightroom problems were solved. So, if you start having massive issues with Lightroom and your computer crashing, you might want to remove any 3rd-party RAM you have installed and replace it.
On another note, I have talked with several photographers who are frustrated that Lightroom won’t work the way "they" want it to. If you learn to use Lightroom the way it was designed, then you’ll have an exceptional experience with the software, and it will make the digital workflow process a lot easier. It can only do what it was designed to do, but as it continues to get better and better, hopefully it will be able to do what you want it to do as well at some point. If you are frustrated that Lightroom doesn’t work the way you want it to, please go to the Adobe Lightroom website and give them your feedback – they have a fantastic track record of listening to their customers and incorporating their ideas into future software updates.
Copyright © 2012 Michael Clark Photography. Used with permission of Michael Clark Photography. If you would like to read more about the book Adobe Photoshop Lightroom: A Professional Photographer’s Workflow or purchase a copy please visit my website. To read the rest of this chapter and the rest of the e-book purchase it for $24.95 on my website. The e-book is a high resolution PDF file.